Most streaming platforms expect audio normalized to −14 LUFS integrated. Upload too hot and the platform turns you down; upload too quiet and you lose impact. This recipe walks you through the 3-minute workflow: upload, measure, normalize, export, and verify—using the LUFS Analyzer. No DAW required, no guesswork, just clean results ready to publish.
Table of Contents
Category hub: /creator/video
Quick Start
- Open the LUFS Analyzer
- Upload your audio file (WAV, MP3, M4A, or AIFF)
- Click “Analyze” to see integrated LUFS and true peak readings
- Select the “−14 LUFS (Streaming)” preset
- Preview the normalized audio with A/B comparison
- Export WAV or MP3 when satisfied
- Re-analyze the export to verify final LUFS matches target
Why −14 LUFS
YouTube, TikTok, Instagram Reels, and most streaming services normalize uploads to around −14 LUFS integrated. Uploading hotter than the target triggers platform limiting, which can crush dynamics and introduce distortion. Uploading quieter wastes headroom and loses impact against other content in the feed.
For a deep dive into platform-specific targets and true peak limits, see Target LUFS for YouTube, TikTok, and Spotify (2025). This guide focuses on the practical recipe: how to hit −14 LUFS fast and verify the result.

Step 1 — Upload & Measure Current LUFS
Drag your audio file into the LUFS Analyzer or click to browse. The tool supports WAV, AIFF, MP3, and M4A files up to about 5 hours (roughly 5 GB). Processing happens entirely in your browser—nothing is uploaded to any server.
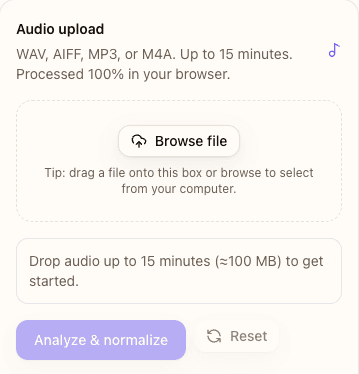
Supported formats and file size limits
The analyzer works best with clips under 5 hours. Longer files can be processed but will take more time, especially on mobile. If you are normalizing an album or podcast series, use the ffmpeg recipe (below) for batch processing.
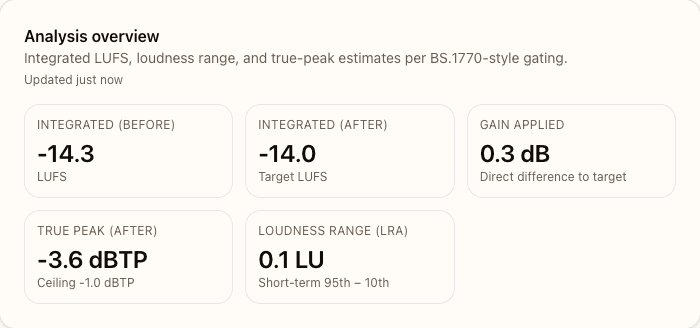
Reading the analysis dashboard
After upload, click Analyze. The tool measures three key values:
- Integrated LUFS: average perceived loudness across the entire file. This is your primary target.
- Short-term LUFS: rolling 3-second average. Useful for spotting hot sections.
- True Peak: absolute peak level in dBTP. Keep this under −1.5 dBTP to survive platform transcodes without clipping.
If your integrated LUFS is already between −13 and −15 LUFS, you may not need to normalize at all. Platforms tolerate a ±1 LUFS window. If you are within that range, consider skipping normalization to preserve the exact dynamics of your original mix.
Step 2 — Choose Your Target & Preview Normalization
Once analysis is complete, the tool shows normalization presets. Select −14 LUFS (Streaming) to target the industry standard. The tool automatically calculates the gain adjustment needed to reach −14 LUFS while keeping true peaks under −1.5 dBTP.
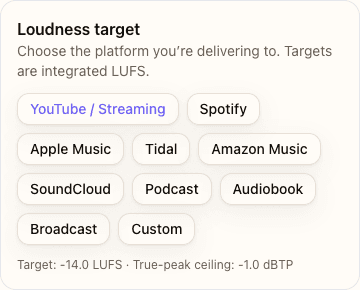
Using the −14 LUFS preset
The preset applies loudness normalization with peak limiting to ensure your audio hits −14 LUFS integrated without exceeding −1.5 dBTP. If your source is significantly louder (e.g., −8 LUFS), the tool will reduce gain and preserve dynamics. If your source is quieter (e.g., −20 LUFS), the tool will boost gain and guard against clipping.
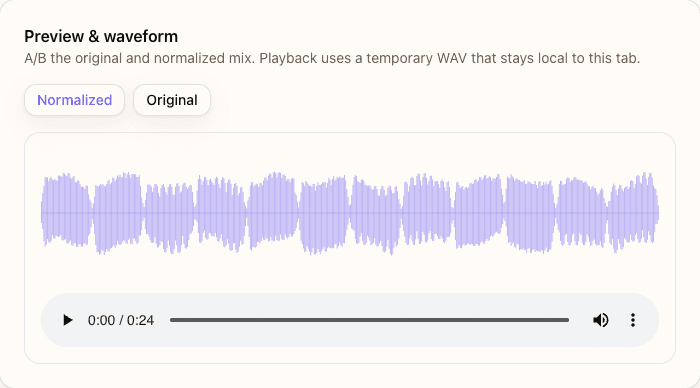
A/B preview comparison
Before exporting, use the A/B preview to compare the original and normalized audio. Toggle between them to confirm the normalized version maintains clarity and doesn’t introduce distortion. Pay attention to the loudest sections—if they sound crushed, consider a slightly lower target like −15 LUFS.
Step 3 — Export & Verify the Result
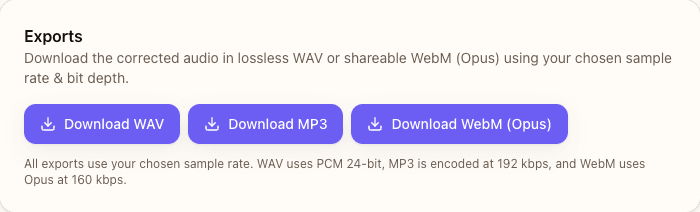
Once you are satisfied with the preview, choose your export format and download. The LUFS Analyzer offers lossless WAV (16-bit or 24-bit PCM) or compressed MP3 (192 kbps) depending on your workflow.
Export format recommendations
- WAV (16-bit, 44.1 kHz or 48 kHz): Best for final masters or if you plan to sync with video in an editor.
- WAV (24-bit): Use if you need additional headroom for further processing.
- MP3 (192 kbps): Sufficient for direct uploads to YouTube, TikTok, or Instagram when file size matters.
Quick verification workflow
After exporting, drag the normalized file back into the LUFS Analyzer and click Analyze again. Confirm the integrated LUFS reads −14 (±0.2) and true peak is under −1.5 dBTP. This verification step catches any rounding errors or edge cases and ensures your audio is platform-ready.

When to Use Manual Gain vs Auto-Normalize
If your audio is already within 1–2 LUFS of the target, you can skip normalization and apply a simple gain adjustment instead. Manual gain preserves the exact dynamic structure of your mix, while auto-normalization may apply subtle limiting to ensure peaks stay under the ceiling.
Use manual gain when:
- Your integrated LUFS is between −13 and −15 LUFS
- You want to preserve the original dynamic range without any limiting
- You are normalizing reference mixes for critical A/B testing
Use auto-normalize when:
- Your integrated LUFS is far from target (±3 LUFS or more)
- You need to guarantee true peak compliance for platform uploads
- You are batch processing and want consistent results across multiple files
ffmpeg Recipe for Batch Processing
If you are normalizing multiple files or processing in a script, use this ffmpeg loudnorm command:
ffmpeg -i input.wav -af loudnorm=I=-14:TP=-1.5:LRA=11 output.wav
This command:
- I=-14: Sets integrated loudness target to −14 LUFS
- TP=-1.5: Limits true peak to −1.5 dBTP
- LRA=11: Preserves up to 11 LU of dynamic range (typical for music and podcasts)
For a two-pass workflow with more accurate loudness compensation, run the command once to measure, then feed the measured values into a second pass. The LUFS Analyzer displays these values after analysis so you can copy them directly into your batch script.
Common Mistakes & Fixes
- Normalizing twice → Only normalize once per file. Re-normalizing an already normalized file can introduce artifacts and reduce dynamic range.
- Ignoring true peak → Check that true peak stays under −1.5 dBTP. Clipping above this threshold may survive your export but fail after platform transcoding to AAC or Opus.
- Using RMS instead of LUFS → RMS measures average power, not perceived loudness. Platforms normalize using LUFS (BS.1770), so always target integrated LUFS, not RMS.
- Skipping verification → Always re-analyze the exported file. Rounding errors or edge cases can shift the final LUFS by 0.5–1 dB.
- Over-compressing before normalization → If your mix is already heavily limited, normalization cannot restore dynamics. Start with a dynamic mix, then normalize to target.
FAQs
- What if my audio is already close to −14 LUFS?
- If you are within ±1 LUFS of the target (e.g., −13 to −15 LUFS), you can skip normalization. Platforms tolerate this range, and skipping normalization preserves your original dynamics without introducing any limiting.
- Should I normalize before or after video editing?
- Normalize audio before syncing it to video. This ensures your audio track is platform-ready before you encode the final video. If you normalize after video encoding, you will need to re-encode the entire video, which degrades quality.
- Why does my normalized file still sound different from reference tracks?
- Loudness normalization adjusts gain to match a target LUFS, but it doesn’t change EQ, compression, or dynamics processing. If your mix sounds thin or dull compared to references, the difference is in mixing and mastering, not loudness.
- Can I normalize multiple files to the same target?
- Yes. Use the ffmpeg recipe (above) in a batch script to normalize an entire folder. This ensures consistent loudness across all files, which is critical for albums, podcast episodes, or video series.
- What’s the difference between integrated and short-term LUFS?
- Integrated LUFS measures average loudness across the entire file. Short-term LUFS measures a rolling 3-second window, useful for spotting hot sections or dynamic swings. For normalization, always target integrated LUFS.
- Does normalization reduce audio quality?
- If you export to lossless WAV, normalization does not reduce quality—it only adjusts gain. If you export to MP3, you introduce lossy compression, but the impact is minimal at 192 kbps and acceptable for most streaming use cases.
- How do I know if I’m hitting the true peak limit?
- The LUFS Analyzer displays true peak in dBTP during analysis. Aim for −1.5 dBTP or lower. If true peak exceeds −1 dBTP, the file may clip after platform transcoding to AAC or Opus. The tool automatically limits peaks when you choose the −14 LUFS preset.