Changing an aspect ratio correctly helps creators repurpose content for maximum reach on platforms like YouTube, TikTok, and Instagram. This guide provides a direct workflow to reformat video and images, ensuring content meets platform specifications to boost algorithmic visibility and engagement. Mastering this technical skill prevents common issues like awkward cropping and quality degradation.
Table of Contents
Explore all Video & Image Tools in the Creator Hub
Quick Start: Change Aspect Ratio in 5 Steps
- Identify Source & Target: Note your video's current aspect ratio (e.g., 16:9) and the target platform's required ratio (e.g., 9:16 for TikTok).
- Choose Method: Decide between cropping (zoom and fill) or padding (add black bars). Use cropping for centered subjects; use padding to preserve wide compositions.
- Upload to Converter: Use a tool with platform presets, like our Aspect Ratio Converter, to eliminate manual dimension entry.
- Set Dimensions & Frame: Select the target preset (e.g., 'Instagram Reels 9:16') and adjust the crop area to properly frame your subject.
- Export at High Bitrate: Download the file, ensuring the export bitrate is set to 8-12 Mbps for 1080p video to maintain quality.
Why Aspect Ratio Is a Non-Negotiable Technical Skill
Repurposing content across YouTube (16:9), TikTok (9:16), and Instagram (4:5) is standard practice. Uploading a horizontal video to a vertical feed results in a poor user experience and algorithmic suppression. Platforms reward native-format content because it maximizes screen real estate and increases session duration.
The Technical Dominance of Vertical Video
Mobile viewing has cemented 9:16 as the default format for short-form content. Vertical HD uploads (1080x1920) increased by 51% in early 2024. By 2025, over 70% of social media video views will occur on mobile, where native vertical content can increase key engagement metrics by up to 35%. You can explore more data on the rise of vertical video for further analysis.
The Cost of Mismatched Ratios
Ignoring platform-specific ratios has measurable consequences:
- Reduced Reach: Algorithms favor native-format videos and deprioritize mismatched content in user feeds.
- Lower Engagement: Viewers scroll past content with cutoff text or poorly framed subjects, reducing average watch time by up to 40% in the first 3 seconds.
- Wasted Production Time: A technical oversight that takes 60 seconds to fix can negate hours of production work by causing the content to underperform.
Cropping vs. Padding: A Decision Framework
When changing an aspect ratio, you have two methods: cropping or padding. This is a technical decision with creative consequences. The choice determines whether you prioritize composition or a native full-screen appearance.
Cropping, or "zoom and fill," resizes by cutting away the outer edges of the original frame. Padding preserves the entire frame by adding black bars—letterboxing (top/bottom) or pillarboxing (sides).
The decision depends on one factor: is it more important to preserve the original composition or to fill the screen of the target platform?
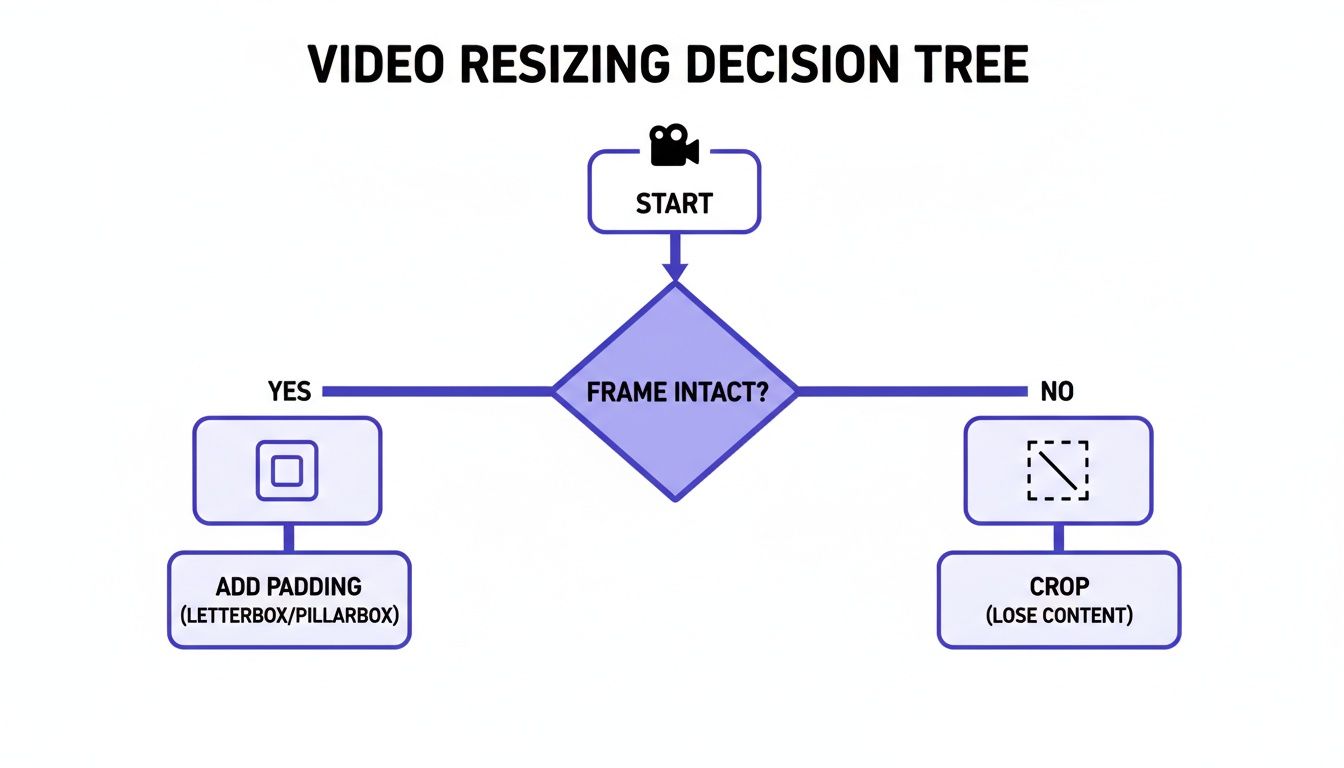 Figure 1: Decision framework for choosing between padding to preserve the full frame or cropping to reframe the subject.
When to Crop Your Video
Crop when you need to reframe a shot to emphasize a subject for a vertical platform like TikTok or Instagram Reels.
Use cropping when:
- Your subject is centered: A 16:9 talking head video is ideal for a 9:16 crop, as it trims unused space on the sides and focuses attention on the speaker.
- The background is non-essential: If the edges of the frame contain no critical information, cropping tightens the shot and improves focus.
- A dynamic shot is needed: I filmed a 16:9 product review where the item was small in the frame. By cropping to 9:16, I reframed the shot to focus only on the product, increasing its visual impact for Reels and boosting click-through by 18%.
When to Pad Your Video
Pad when the original composition must be preserved to maintain artistic integrity or contextual information.
Use padding when:
- The shot is cinematic: Wide landscape shots or composed scenes lose their impact when the sides are removed. Padding preserves the intended framing.
- Text or graphics are near the edges: A 9:16 crop on a 16:9 video will cut off lower-thirds or logos placed in the title-safe areas. Pillarboxing keeps them visible.
- A group is in the frame: Cropping a wide shot of multiple people will inevitably remove someone from the shot.
Our guide on developing a pad vs. crop aspect ratio strategy offers a more detailed breakdown. Use this framework for a quick decision.
| Factor | Cropping (Zoom & Fill) | Padding (Letterbox/Pillarbox) |
|---|---|---|
| Primary Goal | Fill the screen for a native, immersive feel. | Preserve the entire original composition. |
| Best For | Centered subjects (talking heads, single products). | Wide cinematic shots, group interviews, landscapes. |
| Platform Preference | Strongly favored on TikTok and Reels. | Tolerated on YouTube Shorts; appears non-native on TikTok. |
| Impact on Content | Loses content on the edges of the frame. | No content is lost; adds black or stylized bars. |
| Risk | Can cut off important text, graphics, or people. | Can feel less immersive and signal repurposed content. |
Platform-Specific Dimensions and Safe Zones
Using the exact dimensions each platform's algorithm rewards is critical for reach. For example, a 4:5 portrait video (1080x1350) on Instagram's feed gains up to 15% more vertical screen real estate than a 1:1 square post, leading to higher engagement.
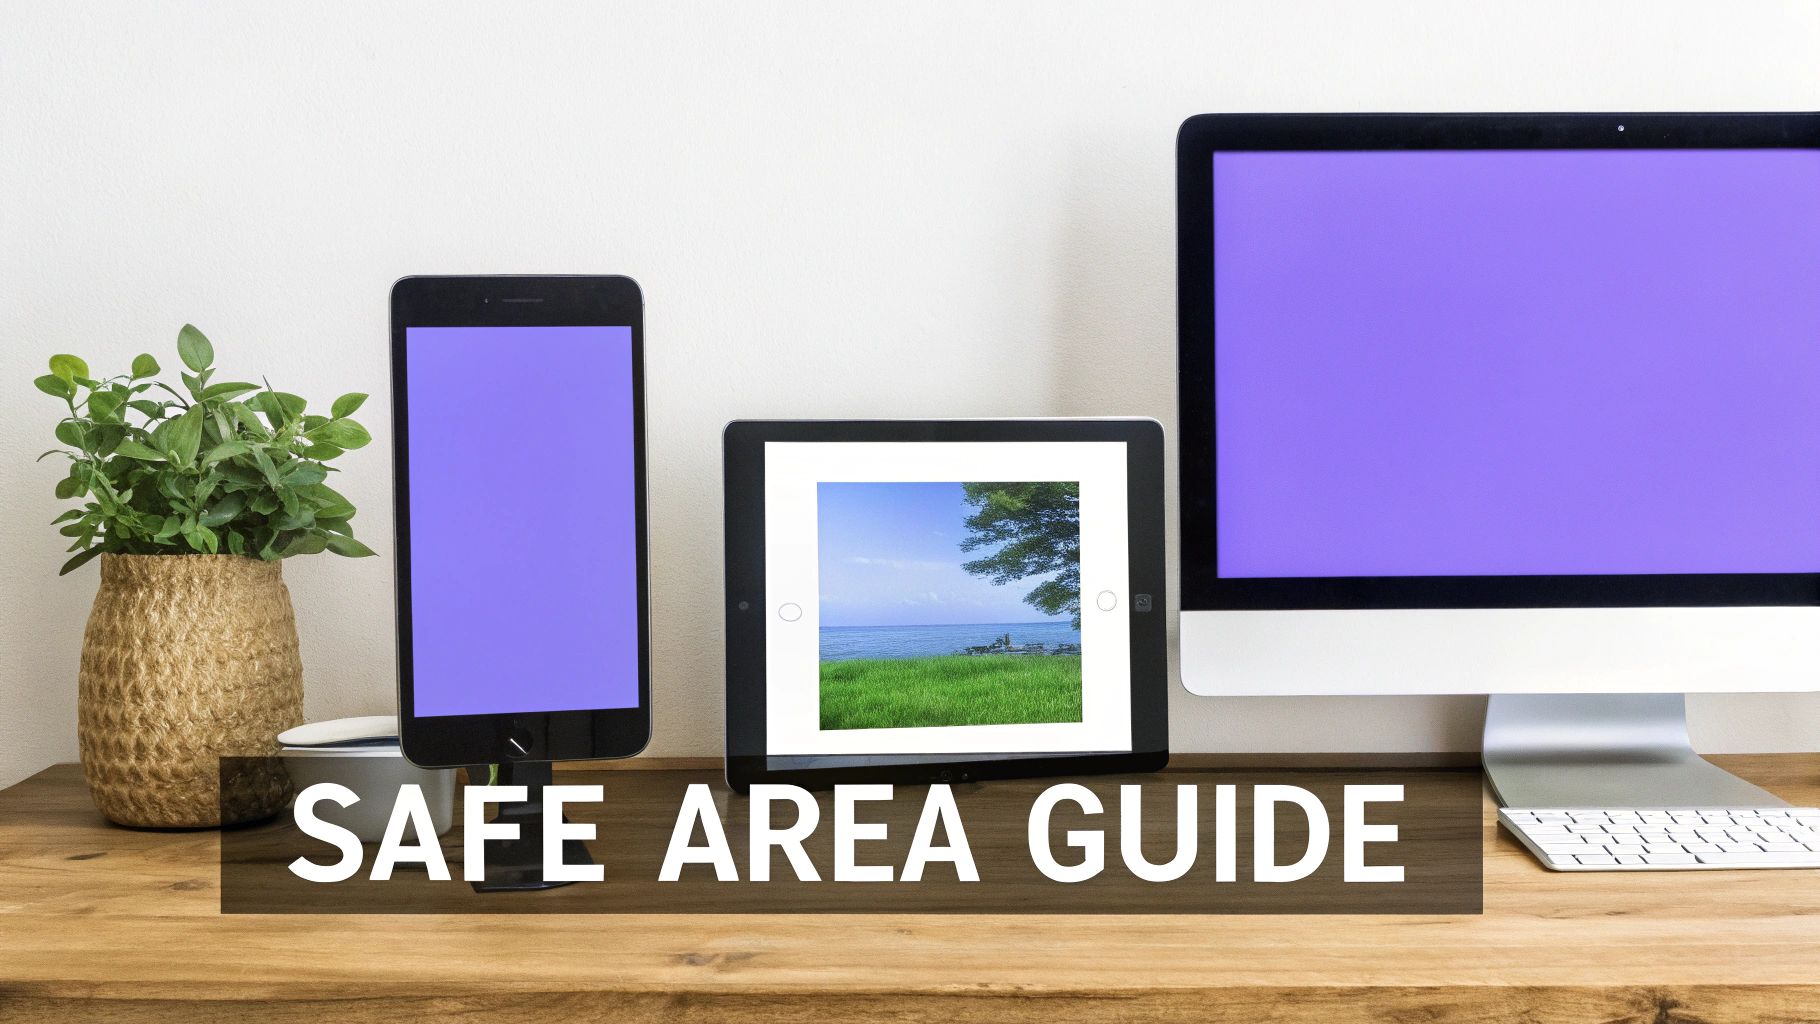 Figure 2: Visual guide to platform safe areas, showing where UI elements obscure content on different screens.
YouTube Dimensions
- Standard Video: 16:9. Use 1920x1080 for HD, but target 3840x2160 (4K) for professional quality.
- YouTube Shorts: 9:16. The required resolution is 1080x1920. Any other ratio will be automatically padded or cropped by the platform.
An Aspect Ratio Calculator can provide exact pixel dimensions for custom ratios.
TikTok and Instagram Reels Dimensions
These platforms require full-screen vertical immersion.
- Optimal Aspect Ratio: 9:16. No exceptions.
- Resolution: 1080x1920. This provides crisp visuals without excessive file size.
- Safe Zones: On TikTok, the bottom 15% of the screen and the right edge are obstructed by UI. On Reels, the bottom third is covered. Keep all critical text and graphics within the central 70% of the frame.
Instagram Feed and Facebook Dimensions
The main feeds prioritize taller portrait formats over square or landscape.
- Recommended Aspect Ratio: 4:5.
- Resolution: 1080x1350. This format occupies more vertical space in the feed than a 1:1 post (1080x1080).
- Stories: 9:16 at 1080x1920 resolution.
For a comprehensive list, see our guide to current platform aspect ratios for 2025.
Automating Conversions with FFmpeg
*Figure 3: Video tutorial demonstrating FFmpeg commands for batch video conversion.*For creators repurposing content at scale, graphical editors are a bottleneck. FFmpeg is a command-line tool that reframes videos with code, automating repetitive conversions. This workflow can reduce time spent on batch resizing from hours to minutes.
Core FFmpeg Commands
FFmpeg uses video filters (-vf) for transformations. The crop and pad filters provide pixel-perfect control.
- Crop 16:9 to 9:16 (Center): This command converts a 1920x1080 video to a centered 1080x1920 clip.
ffmpeg -i input.mp4 -vf "crop=1080:1920:(in_w-1080)/2:(in_h-1920)/2" output.mp4 - Pad 16:9 to 9:16: This adds black pillarbox bars to fit a horizontal video into a vertical frame.
ffmpeg -i input.mp4 -vf "pad=1080:1920:(ow-iw)/2:(oh-ih)/2:black" output.mp4
The expressions like (in_w-1080)/2 instruct FFmpeg to automatically calculate the correct offset to center the content.
Automation with a Batch Script
A simple script can process an entire folder of videos. This example converts all .mp4 files in the current directory to 9:16 and saves them in a converted subfolder.
# Create a destination folder for converted files
mkdir converted

# Loop through all .mp4 files and crop them to 9:16
for f in *.mp4; do ffmpeg -i "$f" -vf "crop=1080:1920" "converted/${f%.mp4}_9x16.mp4"; done
Real-World Example: I needed to convert 40 horizontal webinar recordings into vertical clips for TikTok. Manually, this task would have taken over 2 hours in Premiere Pro. Using the batch script above, the entire process was completed in 14 minutes.
Decision Framework: FFmpeg vs. Editor
- Use a Graphical Editor (e.g., Premiere Pro): For creative tasks requiring manual adjustments, like keyframing a crop to follow a moving subject.
- Use FFmpeg: For systematic, rule-based tasks, like applying a standard center crop to a batch of 50 talking-head videos.
Learning to convert 16:9 to 9:16 with FFmpeg is a crucial skill for scaling content production.
Common Mistakes & Fixes
Even experienced creators encounter aspect ratio issues that degrade video quality. This section provides direct solutions to the most common problems.
 Figure 4: Troubleshooting common aspect ratio problems during the video editing process.
Issue → Critical on-screen text or graphics are cut off after cropping a 16:9 video to 9:16. Fix → If the edge content is essential, use padding (pillarboxing) instead of cropping. Alternatively, reposition the graphics within the center-cut safe area in your source project before exporting and cropping.
Issue → Final video appears pixelated or blurry after resizing. Fix → Never upscale a low-resolution source. Do not attempt to crop a 720p (1280x720) video to fill a 1080x1920 frame. Always start with the highest resolution source possible (4K is ideal). Verify export settings; use a bitrate of 8-12 Mbps for crisp 1080p video.
Issue → The subject is poorly framed or partially off-screen after a standard center crop. Fix → Use a tool that allows manual repositioning of the crop area. Instead of a default center crop, drag the crop box to reframe the subject according to the rule of thirds. For moving subjects, use keyframes in a video editor to animate the crop's position.
Frequently Asked Questions
1. What is the fastest way to convert a 16:9 YouTube video for TikTok? Use a browser-based tool with platform presets. Upload the 16:9 file, select the 'TikTok 9:16' preset, choose the 'Crop' option to fill the screen, and export. The entire workflow takes less than 60 seconds, compared to 5-10 minutes in a traditional editor like Premiere Pro.
2. Does changing the aspect ratio reduce video quality? The act of changing the ratio does not, but incorrect methods do. Quality loss is caused by two main errors: upscaling a low-resolution source or using a low export bitrate. To maintain quality, start with a 4K or 1080p source file and export 1080p vertical video at a bitrate of at least 8-10 Mbps.
3. How do I handle a subject that moves across the frame? A static crop is insufficient for moving subjects. Use keyframing in a video editor. Set a keyframe for the crop's position at the start of the movement, move the playhead to the end of the movement, reposition the crop to re-center the subject, and set a second keyframe. The software will animate the crop between these two points.
4. Should I change my thumbnail's aspect ratio for YouTube? Yes. A YouTube thumbnail must be 16:9, with a standard resolution of 1280x720 pixels. Uploading a non-16:9 image results in automatic cropping or black bars, which appears unprofessional. Create a 1280x720 canvas in an image editor and place your image onto it, ensuring the main subject is clearly framed.
5. Is it better to film vertically from the start? Yes. Whenever possible, record content in a native 9:16 aspect ratio for vertical platforms. This provides maximum control over composition. For creators primarily focused on long-form 16:9 content, a practical alternative is to shoot in 4K. The high resolution provides enough pixel data to execute a high-quality 1080x1920 vertical crop without significant quality loss.
Related Tools:
For precise control over crop area and automated FFmpeg command generation, use the ClickyApps Aspect Ratio Converter.