Adding a watermark to your video protects your intellectual property from theft and builds brand recognition when your content is shared. For working creators on platforms like YouTube and TikTok, this step is critical for maintaining ownership and attribution. This guide provides direct, platform-specific workflows to watermark your content efficiently.
Table of Contents
Explore more guides in the Video Creator Hub
Quick Start
Follow these steps to watermark a video in under 5 minutes.
- Prepare Watermark Asset: Export your logo or text as a transparent PNG file. A resolution of 1024x1024 pixels provides high quality without increasing file size.
- Determine Placement: Position the watermark within platform-safe zones. For YouTube (16:9), the bottom-right corner is standard. For TikTok/Reels (9:16), keep it out of the bottom 25% and away from the right edge to avoid UI overlap.
- Set Opacity: Adjust the watermark's opacity to a value between 20-40%. This ensures it is visible for brand protection but does not distract from the main content.
- Batch Process (Optional): For multiple files, use an FFmpeg command to automate placement. This command places
watermark.png10 pixels from the bottom-right corner ofinput.mp4:ffmpeg -i input.mp4 -i watermark.png -filter_complex "overlay=W-w-10:H-h-10" output.mp4
Choosing the Right Watermarking Tool for Your Workflow
The optimal tool depends on your specific production context. Selecting the wrong tool adds unnecessary time and complexity to your workflow. The decision should be based on video volume, required precision, and the platform where you create and publish.
Desktop Editors: DaVinci Resolve & Premiere Pro
Use Case: Single, high-production videos where precise control is paramount. This method is ideal for flagship YouTube content or paid client projects.
- Workflow: Import your watermark PNG onto a video track above your main timeline. Use transform controls to adjust position, scale, and opacity.
- Advantage: Granular control over keyframing, blending modes, and exact pixel placement.
Command-Line Tools: FFmpeg
Use Case: Batch processing tens or hundreds of videos with a consistent watermark. This is the standard for agencies, production houses, or creators handling large content libraries.
- Workflow: Write a simple shell script or command to iterate through a folder of videos, applying the same filter to each.
- Advantage: Unmatched speed and efficiency for volume. A script can process 100 videos in the time it takes to manually edit two.
Mobile Apps: CapCut & InShot
Use Case: Quick, on-the-go watermarking for content created and published directly from a mobile device, such as Instagram Reels and TikToks.
- Workflow: Use the "Overlay" or "Sticker" feature within the app to import the watermark from your camera roll. Position it with touch controls.
- Advantage: Speed and convenience. The process takes less than 30 seconds and requires no file transfers.
Decision Framework: Which Tool to Use When
| Method | Best For | Speed | Quality Control | Batch Processing |
|---|---|---|---|---|
| Desktop Editors | Polished, single videos (YouTube) | Slow (5-10 min/video) | High | No |
| FFmpeg | Bulk video processing (50+ clips) | Very Fast (<30 sec/video) | High | Yes |
| Mobile Apps | Social media content (Reels, TikToks) | Fast (1-2 min/video) | Medium | No |
Add a Watermark with Precision Using a Desktop Editor
For projects demanding professional polish, a desktop editor like DaVinci Resolve or Adobe Premiere Pro provides the necessary control. I use this method for all my primary YouTube videos to ensure brand consistency.
First, place your transparent PNG watermark on a video track above your main footage. This layers the image independently. Use the transform controls to position it within the title-safe area, typically 5-10% from the screen edges. This prevents the logo from being cropped by different display UIs.
I set the opacity between 20-30% for a subtle but clear mark. This level of transparency is sufficient for brand protection without distracting the viewer.
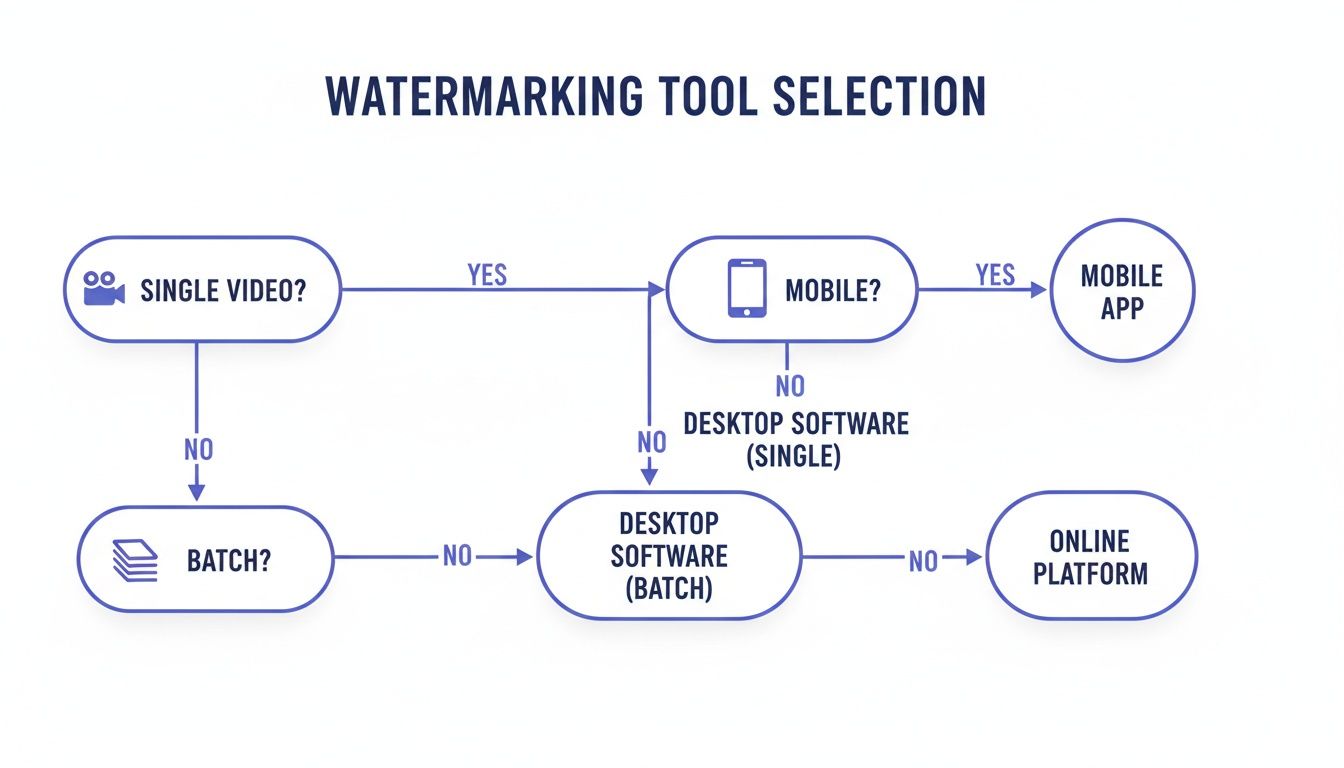
Figure 1: This flowchart helps you decide between a desktop editor, FFmpeg, or a mobile app based on your project's volume and platform destination.
For export, use an H.264 codec with a bitrate of 12,000-16,000 Kbps for 1080p video to maintain sharpness. The principles of layering and safe zones are identical when you need to add text to a video for professional results.
Automating Watermarking for Batches with FFmpeg
When processing a large volume of videos, manual editing is inefficient. FFmpeg, a command-line utility, automates this process, saving hours of repetitive work. A single command can apply a watermark to an entire directory of files.
If you are new to command-line tools, this introductory video explains the core concepts.
Placing a Watermark with a Command
To place watermark.png on input.mp4, open your terminal and execute the following:ffmpeg -i input.mp4 -i watermark.png -filter_complex "overlay=W-w-10:H-h-10" output.mp4
The overlay=W-w-10:H-h-10 parameter controls the position. It instructs FFmpeg to place the watermark 10 pixels from the main video's right edge (W-w-10) and 10 pixels from its bottom edge (H-h-10). This creates a clean, consistent result across all videos.
Example Scenario: A fitness creator needed to brand 75 short workout clips for a new content library. Manually, this would have taken over 6 hours. Using an FFmpeg script, the entire batch was processed in under 25 minutes.
While FFmpeg is highly efficient, its text-based interface is not for everyone. You can find GUI-based wrappers by exploring FFmpeg alternatives. The filter logic used here is also applicable to other tasks, like when you need to convert 16:9 to 9:16 video formats.
Watermarking Videos on Your Phone for Social Media
For content created for TikTok and Instagram Reels, a mobile-first workflow is most efficient. Apps like CapCut integrate watermarking directly into the editing process. Use the ‘Overlay’ function to import your logo PNG from your phone’s photo library.
Positioning for Mobile UIs
Once imported, use pinch-and-drag gestures to resize and position the watermark. The critical step is placing it in a "safe zone" clear of platform UI elements.
For 9:16 vertical video, I position my watermark outside the bottom 20% and away from the right-hand edge. This avoids overlap with usernames, captions, and engagement icons. Referencing the latest Instagram video aspect ratio guidelines is essential for ensuring your branding remains visible.
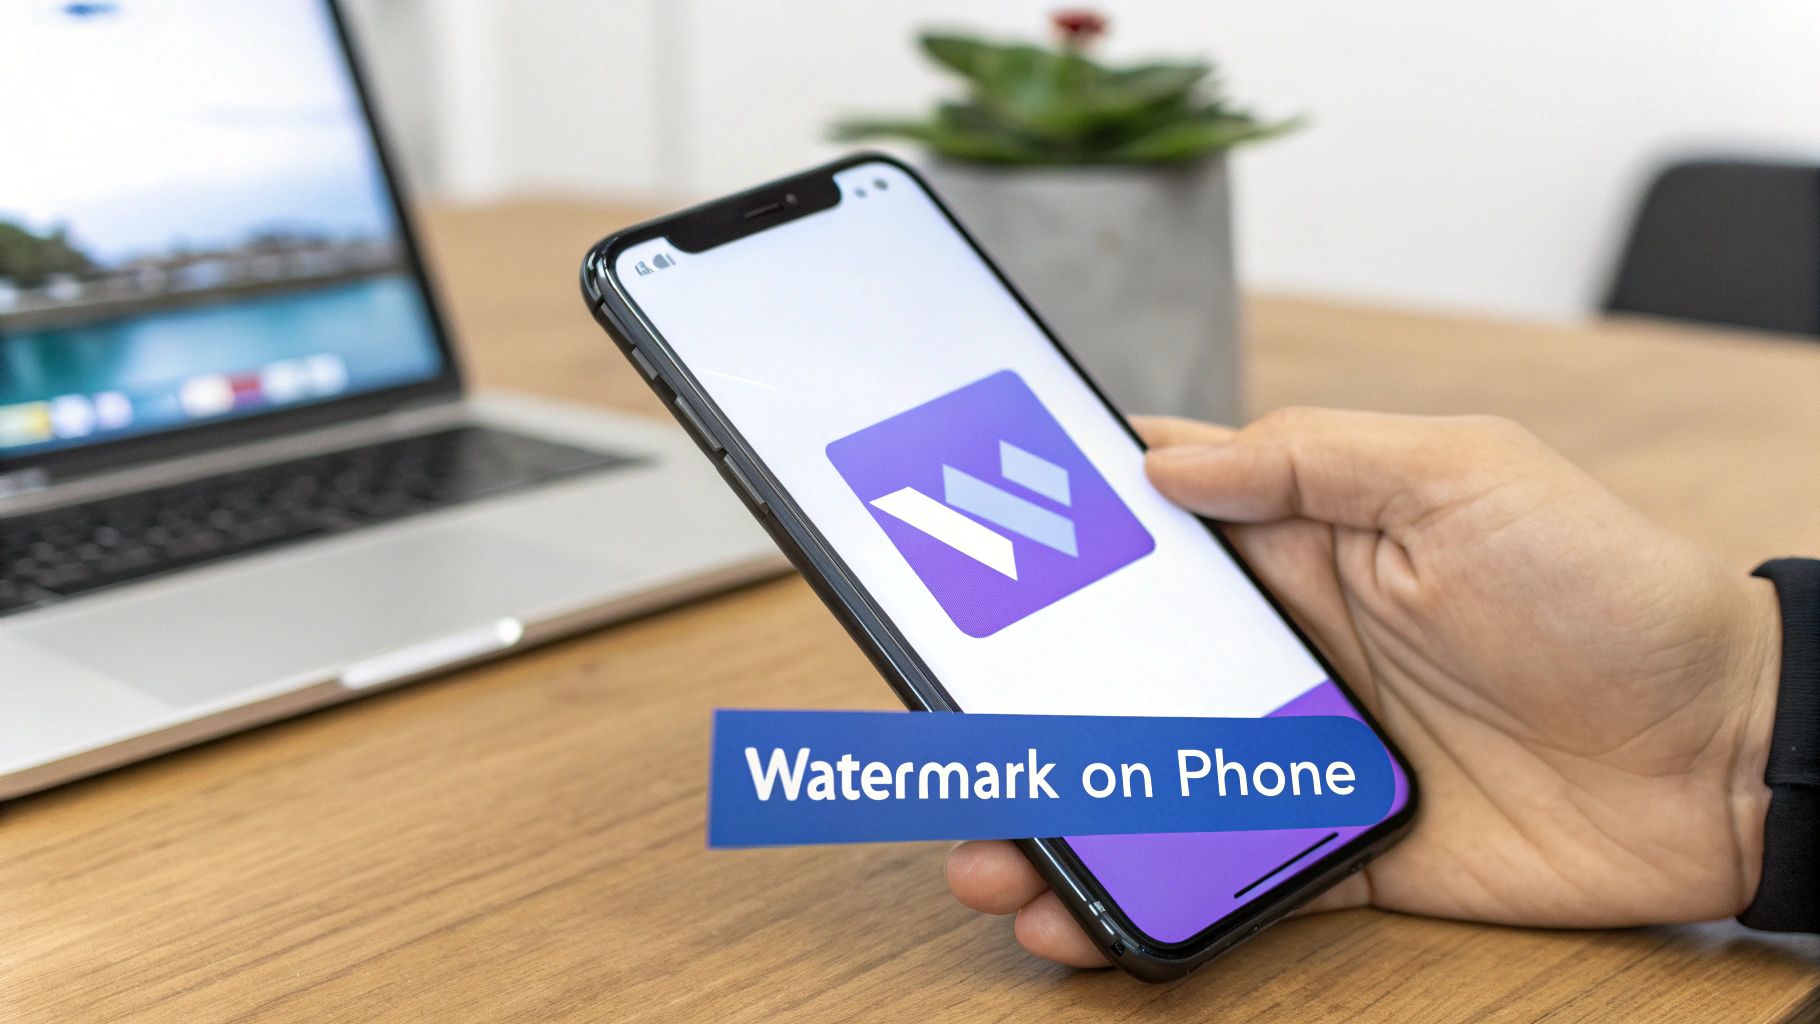
Figure 2: Using a mobile app's overlay feature to place a watermark in a UI-safe zone on a 9:16 video.
Mobile Export Settings
Verify these settings before exporting from a mobile editor:
- Resolution: 1080p for sharp quality.
- Frame Rate: 30 FPS for standard social media playback.
- Format: MP4 (H.264 codec) for the best balance of quality and file size.
Workflow Tip: Create a one-second project in your mobile editor containing only your perfectly placed watermark. Save this as a template. To watermark a new video, open the template, add your new footage, and export. This reduces a 2-minute task to 15 seconds.
Common Mistakes & Fixes
Avoid these common issues to ensure your watermark is professional and effective.
- Issue → Watermark appears blurry or pixelated.
Fix: Use a high-resolution source file. Your watermark should be a transparent PNG with a minimum dimension of 1024x1024 pixels. Also, ensure your video export bitrate is at least 10,000 Kbps for 1080p footage. - Issue → Watermark is too distracting and pulls focus.
Fix: Reduce the opacity to 15-25%. A watermark's purpose is protection, not promotion. Using a monochrome (all-white or all-black) version of your logo also reduces its visual weight, allowing it to blend into the video. - Issue → Watermark gets covered by social media UI.
Fix: Test your placement. Before exporting, take a screenshot of the app's interface (e.g., a TikTok video) and overlay it in your editor to identify the safe zones. As a rule, avoid the bottom 25% and outer 10% of the frame on vertical video.
The market for advanced content protection is growing, with AI watermarking projected to reach USD 4.04 billion by 2034. You can learn more about the growth of AI-driven content protection technologies as they become more common.
Frequently Asked Questions
What is the best size for a watermark file?
A transparent PNG file between 512x512 and 1024x1024 pixels is optimal. This resolution is large enough to remain sharp on 4K video but small enough to prevent increases in file size or export time.
Should I use a static or animated watermark?
Use a static PNG for persistent, on-screen branding. It is professional and non-distracting. Animated watermarks (.MOV with an alpha channel) are suitable for brief intros or outros but should not loop throughout the video, as the motion draws the viewer's eye away from the primary content.
Does adding a watermark increase video file size?
Yes, but the increase is negligible. A static PNG watermark adds less than 0.1% to the total file size of a typical 1080p video. It has no measurable impact on upload times or storage.
Which corner is best for a watermark?
For 16:9 landscape video (YouTube), the bottom-right corner is the standard placement. For 9:16 vertical video (TikTok/Reels), the top-left or top-right corner is safer, as the bottom portion of the screen is often obscured by UI elements.
Can a watermark be removed?
A properly embedded (burned-in) watermark cannot be easily removed without degrading the video quality. While AI tools exist to remove watermarks, they often leave visible artifacts, making the content unusable for professional purposes. The goal of a watermark is deterrence.